April 2012 | Green Patches - Mediterranean Gardening

Saturday, April 28, 2012

How To Choose The Right Container For Your Plant

1 comment

Containers, Plants
With so many containers to choose from, how do you choose the right one?


In this article I would like to share what I have learnt about the different types of containers out there and how the choose the best one for your plants.  I have been through several containers in the last couple of years, so I decided to compile a list of the different varieties and their uses.

When buying a new plant from the nursery, it is important to gather some information about the plant. The people at the nursery can give you some basic care instructions, and if you are given the plant as a gift, you should at least get to know the name of the plant, so you can do your own research. One of the most important features of a container plant, and one that is often overlooked, is the type of container that is most suitable for the plant.


Containers are not just for show. They will be your plant’s home for many years to come, so it is very important that they are the right shape, size and material for your plant. It is advisable to replace the container once you buy a plant from the nursery. The original containers are temporary, and the nursery is more concerned about saving space.


The most common types of containers are made of terra cotta, ceramic or plastic. The type you use depends on the plant. Terra cotta containers that are not glazed on the inside retain a lot of water. The material acts like a sponge, stealing moisture from the soil and your plant. Plants that do not require a lot of water, such as cactus or succulents, are ideal for this type of container. Plants that require a lot of moisture need to be watered more frequently, when placed in these types of containers, to prevent under watering.


When buying terra cotta containers for the first time, it is always best to soak them in a tub of water for a few hours. The material will be very dry the first time, and a good soak helps it to stabilize.  This prevents the container from stealing too much moisture from the soil in the first few days.


Plastic and glazed ceramic containers are completely waterproof. When using these types of containers, care must be taken not to over water the plants. As with any container, drainage is necessary to remove the excess water from the soil. Without proper drainage, you will run the risk of root rot, as the roots that are left in too much water start to rot, eventually killing the plant.


Another important factor when buying containers is the size. You should never buy a pot that is too big, or too small for your plant. Check the size of the original container, and always go for one or two sizes bigger. Placing a small plant in too much soil can also lead to root rot, as the soil takes a long time to dry. This needs to be observed every time a plant is repotted to a bigger container, and not just the first time. If you are planting a lot of different plants in one pot, make sure the size you choose can fit all the containers inside it. This will prevent you from buying a pot that is too small.


The last thing to observe, when choosing a container, is the shape. There are shallow containers, and deep containers, and there is a reason for this. Some plants have roots that go very deep, but they do not spread very much. A narrow and deep container is more suited for these plants. Others, however, have roots that are shallow, but they spread out over a large area. In this case, a shallow and wide container is the better choice.


Choosing the wrong shape can also be detrimental to your plant. If a plant has shallow roots, and it is planted in a deep container, the water will settle at the bottom of the container where the roots cannot reach. This may leave the plant thirsty. In these cases, it is always best to check the top soil for dryness, instead of the weight of the container. The moist soil at the bottom can make the container appear heavy, but the plant needs watering. On the other hand, when a plant with deep, narrow roots is planted in a shallow container, it can become root-bound, and stunt its growth.


You may find that the fancy containers, which are  coloured in a multitude of ways, come in a limited selection of shapes and sizes. If the plant is going to be kept indoors, and you would like a better-looking container, it is a good idea to buy an appropriate pot that will house the plant, and then put that inside the fancy, bigger container. That way, the plant will benefit from a proper container, and you can show it off any way you like.


Read More...

Friday, April 27, 2012

How To Prune The Schefflera Arboricola

14 comments
Yesterday I decided to take another leap of faith. Well not really, since I watched a 'how to' video on you tube before, but nonetheless, it was a first for me; I pruned the Schefflera.  I have put this off for nearly a whole year, and the plant grew to a point where it got completely root bound, and couldn't possibly grow any more.  Not that it could grow any more, it took over half the yard!

schefflera arboricola pruning
Schefflera Before Pruning Apr 2012

As you can see from this rather hazy picture (it was evening so apologies for the low quality), the plant had nowhere else to go.  So I took a deep breath, got the shears, and cut off three stems.  I cut them rather low and tried to keep a ball like shape, which meant that almost half the plant was gone in three little snips.


schefflera arboricola pruning

schefflera arboricola pruning

I tried to keep the cuts as clean as possible, but as you can see I think I did a good job.  Next I trimmed off some leaves, again, trying to make clean cuts, so as to give a better shape to the plant.  I immediately placed the stems into new pots, with the hope that they will grow into new plants very soon.  I have four Scheffleras now, they will make nice gifts.

The next job was to repot the plant.  The plant was in the same soil for over three years, and it had taken all that it could out of the soil.  I removed the plant from the pot, and removed all the surrounding soil from the roots being extra careful so as not to damage any of the roots.

This was not as easy as it sounds.  As I said earlier the plant was completely root bound.  It took the best part of half an hour to remove as much soil as I could so that I could replace it with new soil.  Now came the big decision.  The plant had long roots but was now small.  I did not want the plant to grow any more so I did not buy a larger container for it.  The plan was only to replace the soil but not the pot.  I loosened the roots enough so as to expose the smaller roots at the tips.


schefflera arboricola roots
Schefflera Roots

With another deep breath, I took the shears, and cut off the thin roots.  The roots will grow back as the plant grows, and they will have enough room in their old pot.


schefflera arboricola roots
Schefflera Roots Cut Off
The final step was repotting.  I filled up the old pot with a mixture of soil and compost.  Placed the plant, gave it a good watering and it was as good as new.


schefflera arboricola pruning
Repotted Plant with Old Soil and Roots

As you can see the plant is about half the size it was before.  I heard it say that rule of thumb is to never cut off more than one third of a plant when pruning.  I believe that this is such a resilient plant it will get over the shock in no time at all.  I gave it some all purpose fertiliser as well, assuming that it will help it to grow and recover sooner.

I have also decided to move the plant indoors, so dual shock for the plant.  The Schefflera is a very good air purifier.  I removes CO2 from the air and replaces it with oxygen.  It was wasted outside all this time, and if I keep it in check I am sure it will make a lovely addition to my living room, and we can benefit from it as well. I have placed it next to a bay window in order to get as much light as possible.  We'll see how it goes, if I see this was too much for it, it goes out to it's usual spot in the yard.


schefflera arboricola pruning
My new indoor plant
Update - May 2012

I am happy to report that following a month of suspense, the Schefflera has adjusted to its new surroundings and has sprouted the first baby leaves for Spring.  Looks like everything is going to be all right :)

schefflera arboricola pruning
Little Baby Leaves


Read More...

Sunday, April 22, 2012

Kalanchoe Marmorata New Growth Amidst the Damage

Leave a Comment
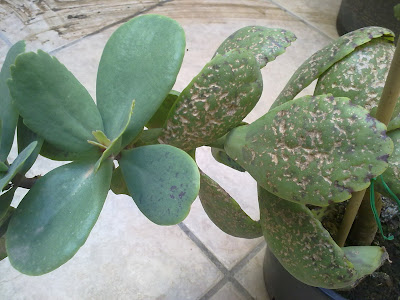
This year my little green patch took quite a beating following a succession of hail storms.  The majority of plants are succulents, with large fleshy leaves that got badly damaged where the hail stones hit.  The Kalanchoe Marmorata was no exception.  Although the leaves were less damaged than my other Kalanchoe, whose leaves are more tender and fragile.  

The flowers quickly withered away after the storm, and I had almost written it off completely, thinking it was an annual and was done for after flowering, but this month I got a pleasant surprise.  

Kalanchoe Marmorata, Hail Damage
Kalanchoe Marmorata New Growth for Spring

Kalanchoe Marmorata, Hail Damage
Kalanchoe Marmorata with lightly speckled new leaves

The first image features the withered flowers at the tips of the plant, I have now cut these off.  The new leaves are growing in the midst of the damaged leaves.  They are still young and only slightly speckled.  This is a very good sign however.  

My problem now is the way the plant is growing, completely bent over to one side.  I have tied the string further up along the stem, to provide more support for the plant, but I fear as the leaves grow bigger it will need more support on top.  The pot is more than big enough for the plant but I may have to repot it, and place it towards the far edge of the pot, if the roots permit.  Alternatively I may have to place it in a different container.

I have not yet watered this plant since last Autumn.  We got enough rain to supply it with nutrients all Winter, and the soil is still moist.  I will need to monitor the plant now, as it starts growing it will need some frequent watering, or so I think.  I haven't given it any fertiliser, and it may need some over the Summer as now I can only give it tap water, which is not the best choice of water.  It's going to be an exciting couple of months watching this plant grow and seeing how it handles its first Summer.


Read More...

Plumbago: A Plant's Life Cycle in Pictures

Leave a Comment
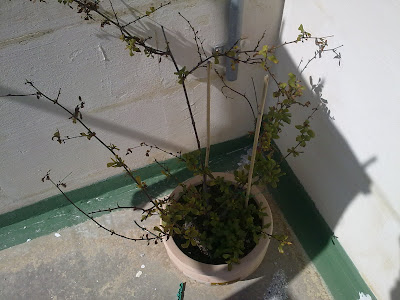
Following the success of my previous post Plumbago Pruning For Winter, I decided to post updates of the plant six months down the line.  It has not been an easy Winter this year, with record rain fall and hail storms.  It was a good test the show the incredible resilience of this plant.  So here is the plant following pruning last October:

plumbago auriculata
Plumbago after pruning

As Autumn gave way to colder weather, the leaves started to drop rapidly.  The plant got a bit of a shock, and could not adjust to the new spot I chose for it.  We had a lot of wind, which is becoming a daily occurrence on this island.  As you can see in this next image, the plumbago looks very poorly:

plumbago auriculata
Plumbago in late Autumn
I watered the plant whenever needed, however the flowers started to droop, the leaves became discoloured and started dropping.  I had to trim off some more dead twigs, and by the time I was finished, the plumbago was a far cry from its blooming glory in summer.

plumbago auriculata
Plumbago in Winter
As you can see, in Winter the plant shed most of its leaves.  I left it pretty much alone to face the harsh Winter weather.  I never watered it, and during the coldest months there was nothing but a few bare twigs showing.  

We are now well into Spring and the plumbago is back in full force.  Last week I gave it some all purpose fertiliser, and I am now watering it once a week.  Today I saw the first blooms as two bunches of flowers are almost ready to open.  

plumbago auriculata
Plumbago in April

plumbago auriculata blooms
First blooms

I have learnt now that the benefits of pruning are incredible.  The plant is fuller in the centre, and it has come back with more vigour this year when compared to previous years.  It's amazing how a couple of months ago there was nothing but a few twigs, and now it's already growing faster than I had anticipated.  

I will give it a heavier pruning this year, I want to get rid of that cross shaped twig at the top of the plant, and shape it a little better.  For now though, I will give it the occasional trim, and look forward to seeing those beautiful flowers again.

plumbago auriculata
Plumbago June 2012


Read More...