June 2013 | Green Patches - Mediterranean Gardening

Sunday, June 30, 2013

How To Tell When Containers Don't Fit The Plants? The Plants Tell You!

10 comments
This week my garden has taught me another lesson.  I learnt the meaning of fibrous and tuberous roots.  I learnt that fibrous roots are thin roots which are shallow and stay close to the soil surface.  Plants with fibrous roots tend to spread them wide and therefore require shallow but wider containers.  Tuberous roots on the other hand go long and narrow.  A tubular root is one long root which travels deep into the soil in search of nutrients to sustain the plant.  Plants with tubular roots therefore require a deep pot to accommodate the them.

In a normal garden the root system of plants may not really matter that much, because the plants' roots can travel every which way and there will still be enough soil, provided they are planted with sufficient space around them.  In a container garden however, the space is limited to the type of container chosen, and it is important to know a little bit about the root system of your plant before choosing the container.  I have already highlighted these issues in a previous post on how to choose the right containers, so I will not go through that again.  In this post I want to highlight the task of identifying the root system of plants and how sometimes the answers do not lie out there.

I few months ago I got an Aloe Vera from a friend.  It came to us in a tiny container, and has been growing steadily ever since. Around the beginning of May growth stopped, and I decided it was time to repot.  I know these plants can grow quite large, and it was not meant to stay in a three inch container!  Since the plant was still so young and seemed to be doing well I didn't really look up much information.  I watered it whenever the soil went dry and it seemed to like it's place in the sun.  I placed the plant in a bigger container and it started growing again in no time.


Aloe Vera
Aloe Vera After Repotting 

Two months later I noticed that the plant seemed to stop growing again.  It had not out grown it's container so I attributed this to the fact that I had moved the plant to a shadier spot in May to make room for other plants.  Slightly worried I looked up some information about the plant.  Among other things I learnt that the plant's root system was fibrous, meaning the roots were thin fiber like and spread out.  

When I repotted the plant, the roots were only tiny so I didn't think that the plant would have grown so much as to be root bound already.  This week however, I was proved wrong.  As I picked up the plant to water it I got a rather fuzzy surprise!


Aloe Vera
Aloe Vera Fuzzy Root

So what's going on here?  Is this plant not an Aloe Vera, perhaps I got it wrong.  I was certain that it was a root coming out of the pot and not some alien growth.  I did another search online and as it turns out there are mixed opinions on the plant's root system!  

I found some sites that say that the Aloe Vera has a tuberous root system, and to plant it in deep pots to accommodate the root system.  Other sites, or in this case the same site, on the other hand say that the plant has a fibrous root system.  To complicate matters further I came across another site which said that the Aloe Vera can develop a fungus called Arbuscular Mycorrhiza.  According to this site, the Aloe Vera has a fibrous root system, but the fungus goes deep into the soil, and  allows the plant to get more nutrients.  Huh?

I decided this case needs further investigation.  I removed the plant from the container, and although the plant did have some thin roots, the main root was the one that found its way out of the pot. Root or fungus, I decided to place the plant in a deeper container as that was the obvious course of action.  The length of the root is quite impressive, almost as long as the plant itself.  That could be a good rule of thumb to determine the size of the container, provided this root is going to keep growing as the plant grows.  The container is not much wider than the previous one, as the plant is still young I don't want to overwhelm it.

This goes to show that sometimes, you can get it wrong when it comes to container plants.  The best thing about nature however, is that it will always show you when there is something amiss.  You just need to read the signs, and with some common sense, and help (or added confusion) from other gardeners, take action.


Read More...

Sunday, June 16, 2013

The Challenges Of Blogging About a Passion Flower

20 comments
This week I meant to write a long post about the passion flower vine I added to my garden a few weeks ago.  I wanted to write about the incredible flowers that are blooming every day now, about its fast growth doubling in size in just three weeks, and about the fact that the vine is slowly but surely trying to get into my house.  I meant to write all this, but I didn't.

Passion Flower

When blogging about my garden, it is very easy to write posts that have been written and re-written all over the net.  I have a few container plants that are quite common, and the simplest thing to do would be to write about how to take care of them, how the changes in weather is affecting them, how they are growing and so on.  I have done this in other posts for other plants, and I was planning to do just that with the passion flower, this is a log of my plants after all.  

Passion Flower


As I was doing my research on the plant, I realized, why do I have to repeat what's out there, what value is my blog post going to add to the reader? The challenge then became, how to write something interesting about the passion flower that the readers can enjoy, without repeating what others have written many times before.  

In my search to find interesting posts, one of two things normally happens.  An idea may come to me, which I then try to support with good pictures.  Alternatively, the garden will show me something interesting, where I take the pictures first, and then I try to explain it in a blog post.  It is not always clear which comes first, but I do find myself in situations where I have pictures, but no post, or the other way around.


Coming back to the subject, I have taken quite a few pictures of my passion flower now, but the post still eludes me.  What can I write about a passion flower that no one has written about before.  How can I look at this from a different angle?  Nothing comes to me, I find myself uninspired. It's such a wonderful plant, however, that I still take pictures to mark its progress, and this brings me to another point.  Are the pictures any good? Not really.

Summer has come all of a sudden, two days ago, without warning.  My garden has turned into a dust bowl, full of soil blowing in from the surrounding fields.  With no rain to wash them down, my plants look like they have been abandoned for years gathering dust, even though it has only been a few days.  Not the ideal environment to take pictures. I could spend a few hours hosing them down, trying to get the soil off the leaves, letting them dry, and take a few pictures for my blog post, but it's too much work in this summer heat.  

passion flower

So here I find myself with no post, and dusty pictures.  I am waiting for the vine to crawl in some unexpected manner, or to do something so outrageous as to warrant a blog post.  In the meantime, I check on it everyday, train it, teach it how to crawl in the right direction, talk to it, and marvel at its beautiful flowers.  I still take pictures, perhaps they can catch something I missed.  Until that day comes, however, my post about the passion flower is going to have to wait.


Read More...

Monday, June 10, 2013

Aphid Control Using Garlic Pesticide

9 comments
Last week I had the unfortunate displeasure of meeting aphids for the first time in my container garden.  In hindsight I was the one who introduced them to my garden quite unknowingly.  They hitched a ride on my Hoya, and I had no idea they were there until two entire stems were completely covered in yellow.  I had noticed the yellow tinge before, but never really took any notice of it.  I foolishly thought it was how new stems looked, since the stems were a darker color than the rest of the plant, see the mistake here.  All was well until I realized, the yellow tinge was moving, and some of it had wings!

Hoya with Aphids
Aphids on Hoya

My first reaction was run for the shears; my second reaction was moving the Hoya away from the rest of the plants.  It took me a few seconds to realize that this was useless in my small yard.  If the aphids can fly, they don't have to go very far to get to another plant. My final decision was to run inside, and search the net.  The source of all wisdom, I was bound to find the answers there, and here is what I found.

To my relief, the yellow aphids were oleander aphids, which are mostly found on Oleander (no brainer that), Milkweeds and the Hoya among others.  They are bright yellow indicating high toxicity, and spiders and birds tend to stay away from them.  Luckily for me, they were not attracted to any other plants in my garden.  

Oleander aphids feed on the sap from the plant terminal.  A colony can get very big, very fast and the aphids can cause substantial damage to a plant.  Depending on the size of the colony, the plant can suffer a few stems, or it can be killed altogether.  A good indication of the damage done comes from the aphids themselves.  If they grow wings, then the colony is getting too large, and they are preparing to move on.  This could mean that there is not much left of the plant to sustain them, or that the colony was centralized in one place, and they have outgrown it.  In my case, all the aphids were congregated on two stems, and the rest of the plant was untouched.

Oleander Aphids, Aphids, Hoya
Oleander Aphids - Image Source

Now, how do I get rid of them?  In all my gardening adventures I always try to go as natural as possible.  The only store bought item in my garden is an all purpose liquid fertilizer, which I don't use very often since I made my own homemade compost.  I was lucky that I never had to deal with pests before, so I was quite unprepared for this one.  I once again turned to the net.  I found all sorts of homemade solutions for getting rid of aphids, and for various reasons I dismissed all of them but one.  Garlic.

Garlic is such an incredible plant. I have a high regard for it, and I always try to use it in my cooking.  I also found out that it makes a great natural pesticide.  It can be used against a whole list of bugs, diseases, fungi all without damaging the host plant. The plant will smell like garlic for up to a month, but it's a small price to pay. 

So here is the garlic pesticide recipe:

4 cloves garlic
1 cup of water
1 splash of olive oil (not sure what this does)

Boil the water and add the garlic. As soon as you can smell the garlic, take the water off the heat, and strain it into a spray water bottle.  Once the water has cooled down, add a splash of olive oil, give the bottle a good shake to mix it up, and you're done.  Please resist the urge to spray boiling water on the poor plant.

With my pesticide in hand I sprayed the aphids until I could no longer see any movement.  I sprayed the entire plant with garlic, and the smell was awful.  It worked beautifully, however, and I got rid of all aphids in no time at all.  

Hoya, Oleander Aphids, Garlic Pesticide
Hoya soaked in garlic pesticide

The reason this works is that aphids are soft bodied creatures, and the garlic will burn them up.  One drawback of using garlic as a pesticide is that it will kill beneficial insects and bacteria as well, so it would be best to use it in a localized area, not like I did.

There is a natural predator of the oleander aphid, and it is not the ladybird.  The braconid wasp attacks oleander aphids, and kills them in a rather gruesome manner.  I always imagine insects killing each other by eating one another, and that is somehow acceptable to my mind.  Not the wasp though, the wasp will use the aphids to inject her eggs inside them, sort of like an incubator.  The aphids will carry on with their daily life, until the eggs hatch inside them, and the wasp larvae start eating them alive.  Once the larvae turn into tiny wasps, they cut a hole through the aphid's body and come out, leaving behind an empty shell.  It's like watching a horror movie!

I think I will stick to my garlic remedy, it's better to fry them and kill them quickly.  The next day, all the aphid bodies had fallen to the ground, and no more movement could be seen.  My Hoya was pest free. I gave the stems a quick wipe, and that was the end of that.  My only concern now is that the stems where the aphids were are dark brown, and possibly dead.  I am not sure whether I should cut them off, or wait and see if they recover.  I think I will wait and see.

Read More...

Wednesday, June 5, 2013

Raised Bed Gardens On Rooftops - Things To Consider

2 comments
Roof gardens have always been popular, particularly with urban dwellers, who may not have the luxury of space.  A roof garden can cover the entire rooftop with turf and plants, and these are most commonly seen in commercial or public buildings.  They are expensive to set up and maintain, and not everyone can install them due to weight restrictions.  Another common type of roof garden is made up of containers and raised beds.  It is the most affordable option, since containers can be made up of all sorts of materials, including reused old junk.  Containers are easy to set up, require little planning, and can be easily moved around until the right location is found.  Raised beds, on the other hand come with a few restrictions, and there are a few things to consider before thinking about that vegetable patch on the roof.


raised bed
Image from uncommonground.com

The Pre-Planning Phase:

Before even planning to install raised beds, it is important to note that if the roof is owned by a landlord, permission should be sought.  Raised beds are heavy structures that require a lot of work to set up.  It is not as easy to remove them if the landlord or other tenants object.  The building code also needs to be observed.  It is possible that roof gardens are not allowed on rooftops due to fire hazards.  Permission may also be required to lift all the materials on to the roof.  Lifting tonnes of soil up to a four storey building is no easy task, and requires some careful planning and organization.

The Planning Phase:

Once permission is obtained, or unnecessary, the first thing to consider before building the beds is weight.  Assuming that the raised beds are not going to be built out of concrete blocks, soil, especially wet soil, can get very heavy.  A rough estimate for dry soil is around 1,200 Kg per cubic meter, or 2,100 pounds per cubic yard. Depending on the desired size or quantity of raised beds, the rooftop can be put under a lot of strain.

Soil density and weight varies, and the best way to calculate the potential weight is to measure a sample of the soil that will be used, both dry and wet.  Then calculate according to the inside measurements of the raised bed.  Apart from the soil, the weight of the raised bed itself, the weight of the plants that will grow in it, and any other structures that already exist on the roof need to be considered.  If the rooftop has a protective membrane installed it will not take too kindly to harsh materials being dragged on it.  An additional layer could be installed to protect the membrane, and this will also add to the weight on the roof.

A nursery or landscape designer should know if the roof can withstand the weight, possibly following an on-site inspection.  Alternatively, the building’s architect will be able to offer accurate guidance.  The architect should also guide you on providing the rooftop additional structural support if necessary. It is important that  an assessment is done properly as structural damage is a real possibility, and can be quite costly to repair, especially if the roof is not your own.    

Another consideration that should go into the planning phase is the kind of plants that will be grown in the raised beds.  In the case of vegetables or other edible plants, such as herbs, care must be taken to ensure that the material that the beds are made of will not run into the soil, possibly adding unwanted chemicals and toxins that the plants can absorb.  It could be bad for the plants, but also bad for human consumption.    If the beds are made of wood, it should be water resistant, so that it doesn't deteriorate with repeated watering. 

raised bed
Image from upper-living.com

The Construction:

Raised beds are essentially large containers.  They can be made up of anything from wooden boxes, concrete boxes, barrels cut in half, or even old bath tubs.  Raised beds are raised off the ground, and they should have sufficient clearing to allow for proper drainage and air circulation.  If the beds are not raised off the ground they can cause serious water damage to the roof of the property, as water sits at the bottom and seeps into the stone.


The Environment:

A rooftop, as with a garden, is exposed to the elements.  There are, however, certain characteristics that may be unique to a roof garden, not necessarily applicable to normal gardens on land.  When selecting the plants for the raised beds, whether the plants need sun or shade will determine the position of the beds. 

Sun is unavoidable on a roof top, however, unless shade is provided by means of man-made shelter.  Heat on a rooftop is also unavoidable.  Apart from heat that is reflected by the sun, the heat coming out of the building, in the form of thermal heat is also present, and can be unbearable in the middle of summer.  Proper air circulation underneath the raised bed is essential.

Wind is also a problem for roof gardens.  Depending on the position of the building, the position of surrounding buildings and the altitude of the roof, wind can be a killer for raised beds, just as it is for container plants.  Since raised beds are normally higher than containers they may not have the shelter of the roof walls, and may be more exposed to wind.  If wind is a risk, it may be worthwhile to invest in shelter, either man-made or by means of other hardy plants that can be grown to act as wind breakers. 

raised bed
Image from livinghomegrown.com

The Gardening:

When the raised beds are ready, filled with soil and plants, and sheltered from the elements.  Something may become obvious very fast is water supply, or the lack of it!  Depending on the size of the raised beds, it is ideal to have a water connection or some sort of water storage on the roof.  It can get very tiring going up and down stairs and lifts filling up buckets of water.  If there is no water connection, a rain barrel could be installed on the roof. 

Space permitting, it would be also a good idea to have a storage unit for all the gardening equipment.  Items like watering cans, fertilizer, soil, and gardening tools can be stored on the roof in a small closet and available when needed.  Better than to realize that you forgot your fertilizer, and you have to go down three storeys to get it!


The Conclusion:

I think rooftop gardens are a great idea for those who do not have the space for a garden. Raised beds or containers can look great on a rooftop especially with proper design.  If the idea is to create a peaceful spot, then it is possible to add a comfortable seating area where one can sit and relax whilst enjoying the view.  The sky is the limit in terms of what to you can turn an empty roof space into, it all depends on the budget, and some proper planning.  The latter, at least, we have covered!

raised bed
Image from apartmenttherapy.com

Read More...

Saturday, June 1, 2013

Types Of Soil For Container Gardening

6 comments


In this post I would like to talk about the different types of soils, where they are best used.  I am no expert in soil, in fact I have recently learnt that I have never used soil in my gardening.  I decided to investigate online and the results were slightly confusing, so I will mention all definitions here, and then you can decide what is best.  I will mention three types of scenarios, container plants, raised beds and gardens.  I will not go into farming, and large plots of land as it is beyond the scope here.

I used to think that soil is soil, you can find it in fields, buy it from nurseries, or get some from generous relatives.  One visit to the nurseries, and I suddenly found myself with a dozen different types of compost, peat, fertilizer  for vegetables, for herbs, for plants; the combinations were endless.

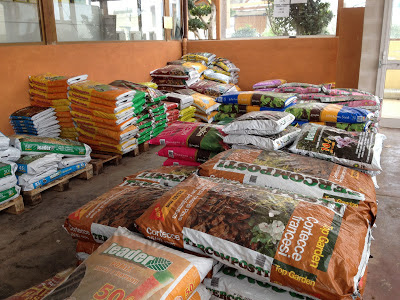
potting mix
Nursery Selection

Plants in hand, I asked the person at the nursery what type of "soil" was best for my plants.  He got a packet of multi-purpose substratum (even though he called it compost, and really it's the same thing), and I never looked back since.

One day a relative of ours gave us  a bucket full of soil from his garden.  It was reddish in color (soil in Malta is called 'Terra Rossa' or red earth), and was full of weeds, and bits of pottery!    I had just planted half of my basil seeds in my substratum, so I decided to plant the rest of the seeds in this soil to see if it made any difference.  The basil that I planted in the multi-purpose compost grew and flourished, the basil that I planted in the soil never even sprouted.  I was gutted, thinking, we have some of the best soil in the world, and I can't even grow basil in it.  I decided to do some research to understand why this happened, and I now realize that my basil never had a chance.

I would like to mention some types of soil/compost/mix as I found them to be the most commonly used.  I hope this helps the humble beginners like myself, experienced gardeners feel free to contribute.


Garden soil is made up of topsoil and subsoil.  Topsoil is normally the first few inches of soil and is where all plants grow.  This soil is rich in organic matter as all sorts of insects, plants, weeds have lived and died there.  Plant roots normally do not go deeper than topsoil and therefore all plants get their nutrition from this soil.  

On the other hand, I have also read that topsoil is considered of little quality and referred to as dirt.  The lack of nutrition can be rectified by adding compost or other fertilizer to it.

Beneath topsoil is subsoil.  This is the soil that is the most dense and compacted, and little plant life  can survive or grow in this type of soil.  This type of soil does not contain the organic material found in top soil since plant roots do not reach this far down.  As a result this type of soil contains little nutrients and makes it unsuitable for growing plants on its own.

Loam:

The amount of praise I saw online for this type of soil makes it necessary to give it special attention.  This week was the first time I heard about this soil so pardon my ignorance.  It is however, apparently the best soil you can use for gardens and farming, being an ideal mixture of sand, clay and silt, contains lots of nutrients, and retains the perfect amount of water.  You couldn't manufacture something like that!

All these types of soil are not ideal to be used in containers for the following reasons:

1. They are full of bacteria, bits of rock and dead organic matter that you don't want in a container.
2. The soil is dense and compacted and does not allow for proper air and water flow.
3. The soil retains a lot of moisture causing possible root rot for plants in a container.

Raised Beds - Somewhere in between


raised beds soil
Raised Beds - Image Source


Raised beds are neither gardens nor containers, but something in between.  They can have a large surface area and are too big to  be considered containers, however they are in a container so they are not a garden!  The soil used in raised beds is also a mixture of topsoil and potting mix, or compost.  

The compost or potting mix helps to aerate the topsoil, so it is not as dense.  This helps the water to flow more easily and drain better in the beds.  Due to their large surface area, however it is also desirable that the soil retains some of its moisture.  The sun plays a big part in moisture loss, so in large volumes it is best that the soil is not too well draining, or the beds will dry out too quickly.

Containers and Small Environments


container soil
Containers - Image Source


In my experience I am beginning to see how container gardening can be more challenging that owning a normal garden. You need to create a small world in a container for your plant to live in and flourish.  Soil is the basic medium in which the plants will grow so it is important to get it right, especially in a container.

Potting Soil vs Potting Mix

I have seen the terms potting soil and potting mix used interchangeably to mean the same thing.  I found, however, a distinction between the two, in Tennille's very informative blog post Potting Soil vs Potting Mix.

Potting soil is a mixture of topsoil and compost as mentioned above used in raised beds.  In large containers this type of soil can also be used for the same reasons.  


Potting mix is a mix of peat moss, perlite and vermiculite among other things, and does not contain any soil.  Vermiculite and perlite are two interesting minerals used in areas such as construction and insulation.  When mixed with soil however, they add certain desirable properties.  


Vermiculite retains air, moisture and plant food and has a slow release system, so the plant will get the right amount when required.  Perlite, on the other hand, retains very little moisture, and is used to prevent the soil from becoming compact, encouraging air and water flow.


Potting mix is what we generally buy from nurseries and use in containers.  The 'soil' is normally sterilized to kill off all bacteria, and prevent the chance of disease.  It is not recommended to re-use this type of soil for plants after other plants have died in it, although I have done this on occasion, and I did not run into any trouble.  


The nutrients in potting mix tend to be absorbed quickly by the plants, and the soil should be replaced once a year, or mixed with fertilizer to replace them.


Compost


Compost is made up of decomposed organic material such as leaves, greens and food if made at home.  This material is very rich in nutrients, and is normally used as a fertilizer, so it should not be used on its own when planting container plants.  It can however be mixed in with other types of soil to increase the nutritional value, such as mixing with top soil to make potting soil.  Compost is not dense, and can be mixed with other soils to create water and air flow in containers or raised beds.  In gardens, compost can be placed directly on the ground, and mixed in with the top soil before planting the seeds, or plants.  


So there they are, the basics of soil!    Many things can go wrong in container gardening. Too much water, too little, lack of food, too much sunlight etc.  The wrong type of soil can also prevent the plants from reaching their full potential, so it's a good idea to have at least some basic knowledge of what there is out there.  Hopefully this post will help achieve that.

Read More...