Lately I had been keeping an eye on an ominous brown spot that appeared in the beginning of July on my Kalanchoe Marmorata. It looked vaguely familiar, but since we are in the middle of Summer, I didn't really think much of it at first. The main stem had a lovely green color, and looked healthy enough.
 |
| The First Sign Of Trouble |
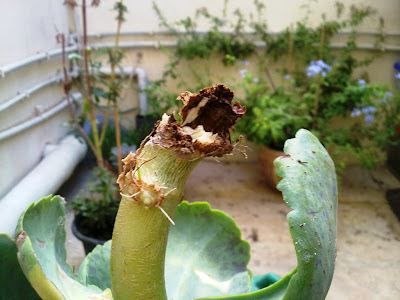
Yesterday as I picked up the pot from its shelf to water the plant, my fears came true. As I picked up the plant the main stem broke off completely, the end bit was completely rotten. My Kalanchoe Marmorata has stem rot!
 |
| Broken Stem With Rotting Base |
 |
| Kalanchoe Stem That Broke Off |
This must be the fourth plant that I lost to stem rot in the last three years, and this time I was determined I was going to try and save it. The stem had not yet gone yellow or brown, meaning that the fungus had not yet started to creep up. I decided to cut off the rotting part, and check out the inside of the stem. When cutting a rotting stem, I try to cut right under a bud or leaf, as it encourages new growth.
 |
| Cutting Off The Rotting Part |
 |
| A Cross Section of The Stem |
I cut off some leaves at the base to increase the length of the stem, and placed in a new pot with some potting mix. I put it in a small pot, because I didn't have a larger one, and because I was not going to water it much anyway. Just a bit of water to encourage the stem to take roots.
 |
| Newly Potted Kalanchoe |
Since the original plant had two stems I decided to do the same with the other stem. I cut it off at the base, removed the rotting stem and root ball, and repotted the stem in its old pot. This may not be a good idea, as the potting mix would be full of bacteria, and disease from the fungus, but I decided to risk it.
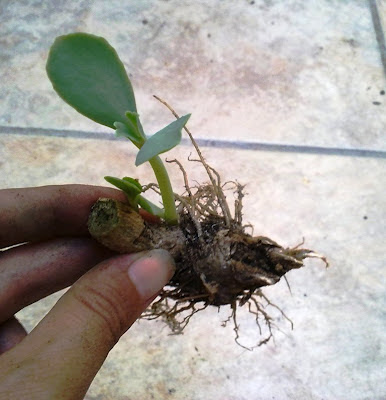
I removed all the soil from the rotting stem and roots to see what's going on there. I wanted to see what stem rot was really about. Here's what I found:
 |
| Rotten Stem and Root Ball |
 |
| Excuse The Dirty Fingernails !! |
The top part appears brown and rotting. It was soft to the touch and kind of squishy. The rest of the stem and roots however appear to be fine. The other stem was not rotten, which leads me to believe that I may as well have left the other stem of the plant intact. The roots also appear to be just fine.
Another solution could have been to remove the plant from the soil, gently removing all the soil from the roots, and cutting off just the roots, or stem that appear rotten. If I had caught it earlier, I could have left the plant intact, and just cut off some rotting roots. In any case I think I made the right decision to try to save the plant. I did sacrifice the little bud that you can see in the picture above, but I now have three pots of Kalanchoes, and that's more than enough.
Here is what I think happened. The Kalanchoe is a cutting from another plant I have in my container garden. I placed it in a big pot, and soaked it with water. The cutting was quite large, but the roots were still short. Placing the plant in a big pot was not really an issue, the problem was my soaking the entire pot with water. The roots could never have absorbed that much water. Since we are in summer, the topsoil was getting dry as the sun evaporated the moisture, but that didn't mean that the Kalanchoe needed water. I hope to do better with these two now.

.JPG)


Hi, I think you may need to lighten your soil as well, seems very compact? These are from Somalia and neighbours, like a bit of sunlight/very bright light to encourage the leaf markings/paterns, once a week in warmer, two weeks in winter. Maybe this is all known to you, then good luck, they are very nice, they make pups from the base. I think you've done a great post, interesting to see what happens, keep us informed! LT
ReplyDeleteHi, thank you for the comment and for the info.
ReplyDeleteVery interesting! The same thing happened to a sedum I had planted in the ground.
ReplyDeletehalf compost, or garden soil or potting soil and half coarse sand or fine gravel - seems to suit most of my plants.
ReplyDelete