Green Patches - Mediterranean Gardening: Home

Saturday, February 14, 2015

The Umbrella Plant Who Gets Homesick

Leave a Comment
I have a love hate relationship with my Umbrella plant.  I have had this plant for over four years now and it has been growing happily ever since.  Growing so much in fact that it is completely taking over my small yard.

Schefflera Plant
Umbrella Plant - 2010

Schefflera Plant
Umbrella Plant - 2012

I have tried various methods to keep this plant under control.  The first attempt was to prune off almost one third of the plant, and brought it back to its original size.  This was an easy job, and I was quite happy with the result.  I did, however, do one mistake.  I placed the plant indoors thinking it will make a fine indoor plant.

In general Umbrella plants make good indoor plants, they are also beneficial as they absorb a lot of toxins from the air, and release clean oxygen.  I placed my plant next to a big window in the living room, where it got lots of natural light but no direct sunlight.  

Schefflera Plant indoor
Umbrella Plant Indoors after Pruning

After a couple of weeks I started seeing signs of decline.  The leaves were going yellow and dropping off.  Then I realized that the remaining leaves had a sticky substance on them, it almost looked as if the plant was sweating.  I feared bugs, but there were none to be seen.  Eventually, after about four months I gave up and placed the plant outside in its original spot.

Almost immediately I saw an improvement.  The plant started growing new healthy leaves, the old leaves were no longer sticky and I can honestly say it actually looked happy!  Needless to say in about a year the plant was back to its enormous size, so I decided to try a new tactic.

Instead of trying to control the plant's growth I was going to set it free and place it on my roof.  The plant was so big it hardly passed through the doorways of my house, but finally I set it in place, in a sheltered spot.  I changed the pot to a bigger one so that the roots had space to grow, thinking that this plant was going to become a monster, and I left it alone.


Schefflera New Leaves
Umbrella Plant New Leaves

A few weeks went by and once again the plant went in decline.  I saw the same series of events occurring, the leaves started yellowing and dropping, and the plant looked miserable.  I persisted and after a few more weeks, one of the branches was almost without any leaves.  There was sign of new growth, however, so I decided to leave it, and wait a bit more.  The plant started growing new leaves but there were nothing like the original large and dark foliage.  They were small and shriveled leaves. I thought maybe this plant needs a bit of time to adapt to its new climate so I left the plant out on the roof for over six months.


Schefflera on rooftop
Umbrella Plant on Rooftop after 6 months
This afternoon I couldn't bear to see it anymore.  I brought the plant back down to my small yard where it belongs.  I will give it a few weeks to recover, I am sure that it will jump back in no time at all.  I plan to propagate this plant with layering.  I will try to get the leaning branch to root, and make a new plant out of it.  Then I will trim the remaining plant into shape, and keep it in my yard, in its proper place forever.

Read More...

Thursday, July 18, 2013

Two Wrongs Do Make One Right In The Garden

8 comments
I enjoy going out in the yard, have a look around, like a foreman watching a project unfold, and give some satisfied nods.  Lately, however, two spots have been catching my eye, and I look at them in disapproval, as if they will magically disappear or right themselves.  

The first sore spot was a large pot that I had purchased with the idea of filling with herbs.  I did plant rosemary and sage in it once, but that was a disaster.  After I threw the dead plants away, I stuck the container in a corner never to see a pinch of soil again.  It was too big for my yard, and I had no plants to plant in it.

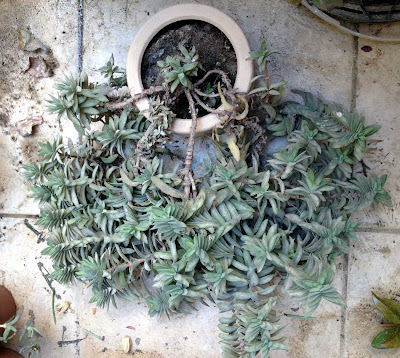
My second sore spot was my succulent on the succulent shelf.  I have had this plant for over four years now, and it just keeps hanging on to dear life.  I have completely neglected this plant, never repotted it, hardly ever water it, and when I do the water goes straight out, the compost has become so hard it fails to absorb any water now.  I know what I should do to rescue it, but I just don't want to!  Still there it is, a monster of a plant staring at me in defiance everyday.

succulent


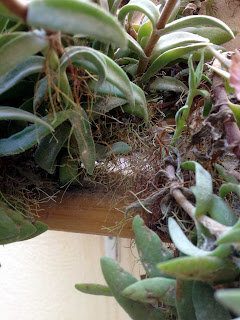
Yesterday I decided I had to do something about this plant.  I took a closer look at it, and I saw that all its stems and leaves had sprouted roots.  Now I know where it was getting its water from.  The stems' roots that touched the wood collected the water that came out of the pot, ingenious.  I had noticed these roots before, but now it was like a small jungle, a mini ecosystem hidden among the leaves.

succulent roots


I was curious to see what was going on in the pot, so I lifted it as gently as I could.  I was not able to hold all the stems in my arms it was so big.  I spread it out on the floor, and I could see the main stems jutting out of the pot.  I am not sure if this is the way this plant is supposed to grow, but it looked almost deformed.  All the stems took the shape of an 'S' as they hung out of the pot, and rested on the shelf.  The middle of the pot was almost completely void of any leaves, just a few stems looking haggard, and half dead.  

succulent


So what now?  As I stared at it many thoughts came to my mind.  Give it away to someone with a bigger garden?  Cut it up  in smaller plants and give them away? Throw it away?!  (Yes that thought did cross my mind I'm ashamed to say).  I pondered for quite a while, and I even asked my gardener friends on my gardening group on facebook.  Then it hit me, ideally this plant would go into the ground as someone suggested.  I don't have any ground, but I do have a rather big pot!  I was sure it would fit nicely in it, and it could be a contender for my roof garden.

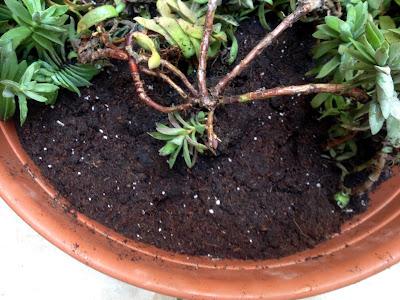
Today, after more than four years, my succulent has a new home.  The soil crumbled in my hand as I gently lifted out of the pot, and carefully placed it in the new soil.  It was no easy task.  The stems were bent in such as way that I could not get them to stay.  


succulent


succulent


I gave the plant a much needed shower, and soaked it through.  I am hoping now that the roots will take to the soil.  If it does and this plant continues to grow it's going to be huge.  I might take cuttings and place them in the soil where there are empty patches. That could wreak havoc, but I am now confident this plant will endure the tightest of living quarters, and the harshest environment.  It could very well be my super plant!! :)

Read More...

Wednesday, May 29, 2013

Taking Care Of A Hoya Plant

7 comments
My latest addition to the yard is a Hoya.  I got to know about this plant only recently through my dad, who has a big one in in garden.  I thought the flowers were fascinating, wax like with a pretty pink color.  Last weekend I got a cutting from him and decided I will add it to the rest in my yard.  My dad was very generous with his cutting and I got a plant which was already over a meter long in some places.  

Hoya Basics:

The Hoya originates from the tropical forests in Asia.  It's habitat is humid and moist, and it can survive for long periods in rain or drought.  The plant is a climber, weaving it's stems around branches of trees as it grows, and makes its way up.  I have seen mixed reports on its growth, depending on the variety, it can grow from 4 feet up to 20 feet.  Let's just say, it's not a small plant!

At home, the Hoya prefers indirect sunlight, since it's natural habitat is normally filtered light through the forest canopy.  It could tolerate shade, but perhaps won't bloom as much.  The Hoya can be grown as a houseplant, placed indoors behind a window with filtered light.  Outside, it can be grown in hanging containers, allowing the stems to hang down, or else as a climber against a trellis.

The plant is pretty low maintenance when it comes to watering and re-potting.  Starting the plant in a container of potting mix is the best idea as it likes rich soil with very good drainage.  The compost can be left to dry a bit between each watering.  The plant enjoys being root bound, and will produce more blooms this way, so unless it is absolutely necessary, the plant won't need re-potting.

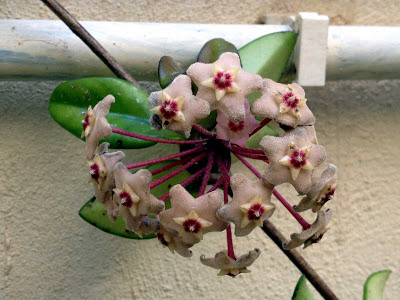
The variety I have is called M.Carnosa and has pale pink flowers with a magenta corona.  The plant flowers in Summer and the flowers do not need to be removed once dead, the plant will drop them when ready and can produce more flowers from the same stalk.  I have read that moving a plant that has flowers will drop them when placed in the new location.  This hasn't happened to me yet, but you never know. 

Hoya Plant care
My Hoya Plant

Back to My Plant:

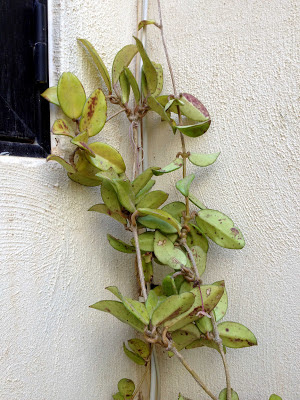
The plant I have was propagated from a bigger plant which is already over 2 meters long (6 feet) in some places.  It was placed in full sun, and all the leaves are yellowish, and burnt in places.  I am hoping that my yard will be a better place for the Hoya, and the leaves will be replaced with green ones.  

Hoya Plant care
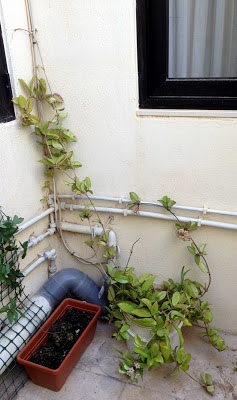
Hoya hanging on the wall

The Hoya was planted in soil, just as the original plant was, and I think the container is a little too big for it.  I have, however, decided not to move it for the time being.  The plant should be flowering by now, and I don't want to disturb it too much.  If the container (an old pail) is is too big, or the soil is not rich enough, then I will re-pot it in another container with potting mix sometime towards the end of summer, or early winter. I should be able to tell all this by the amount and quality of flowers that are produced, but since this is my first time with Hoyas, I will probably leave it there a couple of years, unless it is looking really bad.

For the time being, I have decided to hang it against the wall, until I can figure out what to do with it.  I am still not sure if the place I chose for it is good enough.  It does get some morning sun, maybe a couple of hours.  It is very close to the passion flower though, so I will give it some time to settle down, and they make a decision.

Hoya Flowers Care
Hoya Fowers

I have just two bunches of flowers, which, as you can see from the above picture, did not take the move all that well.  They are still hanging in there though.  It's another reason why I don't want to disturb it that much, I want to see it bloom so I can see those lovely flowers.

I am sure that after a few months in my yard it will look great.  I am tempted to buy a pole/large branch for it to climb.  Wouldn't that be a nice feature ?


Hoya Plant Care
Hoya
Read More...

Saturday, May 18, 2013

Of Sparrows and Gas Heaters

10 comments
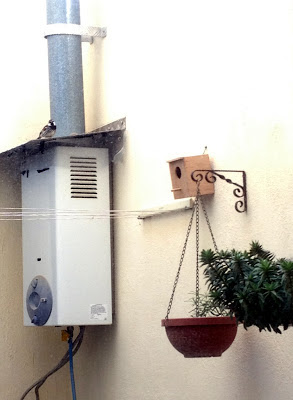
The yard where I keep all my plants is also used as a utility area which houses things like gas bottles (we don't have direct gas connections in Malta), and a gas water heater.  A couple of weeks ago we noticed that the water heater was not heating as well as it used to, and so my partner decided to take a closer look.

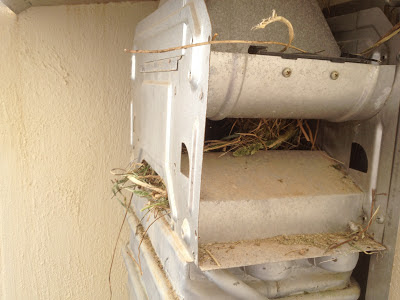
A couple of twigs jutted out of the outer cover, but nothing could have prepared us for what was inside.  It seems a couple of sparrows had decided to make the heater their home for Spring.  Every cavity was filled with twigs, pieces of hay, pieces of grass, and even plastic.  The burners that are used to heat the water are further down, but I can guess they realized that this was a warm place to build their nest in.  Not that they need warmth in this weather.  The obvious problem for us was that the fumes from the burners could not get to the chimney because of all that nesting material.


gas heater nest
Gas Water Heater Nest
As we removed all the twigs and material from the gas heater I could see the male sparrow flying overhead chirping.  I can image their disappointment as they saw us destroying weeks of labor in half an hour.  We ended up clearing half a garbage bag of the stuff.  Next we closed off all possible entry ways with wire mesh.  

gas heater closed
Entry ways closed off
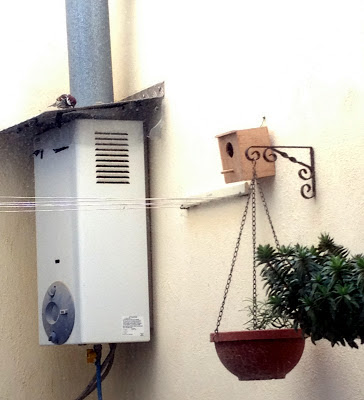
Since we evicted the couple rather ungraciously, I bought them a bird house, and we hung it right next to the gas heater in the hope that they can make it their new home.  It's much smaller than their chosen location, but that's all they get I'm afraid.


bird house


Job well done we were ready to call it a day.  I stood in the kitchen which leads out to the yard, and then I saw Mr Sparrow flew over to investigate.....

sparrow
Mr Sparrow assessing the damage done

sparrow
Mr Sparrow flying down for a closer look


sparrow
Mr Sparrow accusing me
sparrows
Mr Sparrow calling out to Mrs Sparrow
sparrows
Mr and Mrs Sparrow eyeing their new home

Will they go for it?  Not yet.  

They still come occasionally, but I don't think it will happen this year.  We are in peak Sparrow mating season right now with countless sparrows chirping away building their nests and laying their eggs.  Some birds are already being born (they sometimes fall out of their nests onto the street :(  ) I think it's too late for them to start over now.

Maybe next year.
Read More...

Friday, May 10, 2013

Of Mint, Rosemary and Basil - A New Approach!

2 comments
The other day my better half went grocery shopping, and came back with three pots of rosemary, basil, and mint.  Since we were not going to use the herbs for another few days, and most probably not all at once, I decided to place them in bigger pots in the yard.

I have tried to grow basil and rosemary before with some success.  The basil was always grown up on the roof in full sun, and it was always a success, but we had to make sure that we watered it almost every day.  Rosemary was not as successful, believe it or not, the summer sun was a little too much for it, and despite watering it regularly, it died pretty quickly.

I have come to realize over the years that when you read, 'requires full sun' on plant instructions, there is a big difference between say, full sun in England (sorry guys :) ), and full sun in Malta.  Our sun can be a bit too much, and normally all plants here can live with bright conditions in bright places away from direct sunlight.  Imports that come from European countries further north from us especially.

When it comes to herbs, I have always shied away, thinking I don't have enough space in the yard, and it was too inconvenient on our roof top.  This time however, I have decided to give it a try.  

 So here we start with Mint:

Mint
Mint
I have actually read that Mint can grow everywhere so I will be pretty disappointed if this plant dies on me.  Apparently it requires partial shade and soil kept moist, not too soggy and not too dry.  I should be able to enjoy this plant all year round in our climate since we do not have any frost, and our winters are quite mild.  The rain might be an issue, but the plant can be taken indoors during Winter.

Next on the list is Rosemary:

Rosemary
Rosemary
I placed the Rosemary in a hanging pot because it is a spot that gets the most sun.  This plant should require little watering, and no fertilizer.  I read that if you cut sprigs regularly it should keep growing happily without any problems.  I did not manage to save my plant past a few months last year, it was however planted together with Sage.  I have a feeling that here may have been some competition for resources there.  Let's see how well it does in its own container this time around.

And finally, back by popular demand, Basil:

Basil
Basil
This plant should also require lots of direct sunlight and as long as the soil is kept moist there should be no problems.  We did have success growing basil in full sunlight in the past, let's see how well it does in its current location where it only gets some morning sun.

So there they are the three contenders this Spring.  Now for the new approach.  We have decided to ignore all the instructions, and planted all of them in compost.  We have placed the Mint in a shady spot where it gets bright light, but no sunlight.  The basil and rosemary do get some direct sunlight in the morning, but for the rest of the day they only get bright light till evening.  We can keep an eye on them, and water them only when necessary (when the soil is almost dry).  

We will also take sprigs and leaves when needed. Basil is always in high demand in our household as it goes well with most Mediterranean meals. It is also easy to freeze. We usually use rosemary in Winter with a good leg of lamb or chicken.  It does wonders with fish though, so I will definitely use it in Summer.  Mint is not a favorite of mine, however it is also great with fish, and to make sauces and dressing, plus who can say no to a refreshing Mojito in summer?


Read More...

Wednesday, May 8, 2013

Plumbago Resilient After Heavy Pruning

5 comments
This morning I got a great surprise, the Plumbago survives to see another Spring!  A couple of weeks ago the Plumbago seemed like a gonner, it was all dried up with no leaves at all, and hardly any good branches left.  Usually by this time of year I would be enjoying some lovely purple flowers, but this year it was not to be.

dried plumbago


I cut all the dried branches all the way to the bottom of the pot.  Where I saw that the inside was the branch was still yellow and supple, not dry and dark brown, I stopped cutting.  I watered it regularly, but did not give it any fertilizer, for no particular reason.  Perhaps I thought it was no use, and it would not survive the heavy pruning.

Plumbago after pruning


As you can see from the image above the inside of the branches where I stopped cutting look like they have some life in them still, and there were a few green leaves.  

The green leaves have now dried up, but this morning I saw new branches, and leaves sprouting out of the branches.

Plumbago taking life again

New Baby Sprouts

They are small signs of life, but life none the less.  This gives me hope that even though I pruned it right in the middle of Spring, it will still recover.  Since it rained yesterday I have not watered it, and have not given it any fertilizer yet, but I will next time I water it.  Who knows I might still get a few flowers for Summer after all.

One thing's for sure, this plant is as resilient as I read it is and it seems like no matter how much you prune it, it will keep coming back.  :) 

Here's an update just three weeks later!

Plumbago Pruned
Plumbago Foliage 

plumbago leaves
The Leaves Seems Bigger!


Read More...

Friday, February 8, 2013

Schefflera Yellow Leaves and Sticky Leaves!

Leave a Comment
schefflera scale
Image Source

The Schefflera hasn't been doing so well lately.  I have been noticing that it is looking rather depressed, hardly requiring any water, the leaves are turning yellow and dropping occasionally, and no new growth is showing. I used to think this plant was very hardy, and required very little maintenance, but I guess this is only true when the right conditions are met.

When I moved my plant indoors in September of last year I placed right next to a big window, so it could get as much light as possible.  About one month later I noticed that the leaves were turning yellow, and at first I attributed this to the fact that I wasn't giving it enough water.  Scheffleras, however, give out opposite signals when it comes to water requirements, if the leaves turn yellow or have yellow spots it means too much water, whereas leaves that turn blackish in color means that it is not getting enough.  

Another thing I noticed was that the leaves at the bottom started falling off.  This was definitely a sign of over watering, so I stopped watering the plant altogether.  This had little effect, and over time more leaves started going yellow.  I was now beginning to panic.  This plant was huge and healthy, the only thing I ever did to it was give it a good pruning, and I was starting to fear that I may have over done it.  

If this wasn't enough, I then noticed that the green leaves had this shiny coat on them, and were sticky to the touch.  Upon further investigation, the floor area around the pot was also sticky.  I had noticed this almost immediately, but I didn't think it was the plant that was producing sap.

I did some research, and I found out that the sap could actually be a scale insect infestation.  These insects suck the juices from the plant, and then secrete a form of sap on the leaves. Scale insects are brown stubs, like small buttons, that attach themselves to the stems of the plant.  Their bodies are quite hard and they can be seen easily with the naked eye.  As far as I can tell, my plant is clear. Aphids also produce a sticky substance called honeydew, but I found none on the plant.

Eventually I decided that the best course of action was to take it back outside.  I had this plant outside for three years, and it was quite healthy.  The moment I took it inside it started growing weaker.  A couple of weeks went by and the plant started showing signs of recovery.  It dropped the leaves that were too far gone, but those that remained started turning green again.  I did not water it at all during this time.

A few weeks later I started seeing new leaves starting to grow, and by now the plant was full of green leaves, and all the sticky substance was gone.  It rained a few times, and water seems to have given new life to the Schefflera.  I never saw any insects or brown spots that made me suspect that the plant was infested.

I now believe that the problem with the Schefflera was lack of light, and ventilation.  We hardly ever open the window where I placed it, and even though it was right next to a big window, the curtains, which are sheers, were still blocking too much light.  I'm glad that's all it was, I got a good scare with the results returned online, but you never can be too careful.

Read More...

Thursday, August 9, 2012

Orange Blooms For My Kalanchoe

4 comments
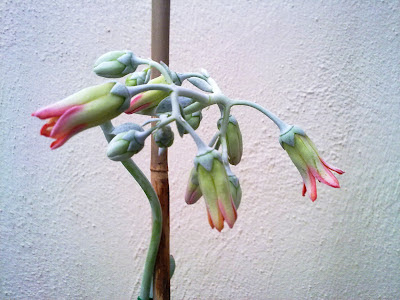
My Kalanchoe is finally blooming.  I was so curious to see what flowers will emerge, and Donna they are orange flowers too!  Here are some pictures I took this morning.  


kalanchoe flowers

The light is playing tricks on me here, the flowers look pink but they are in fact orange...

kalanchoe flowers

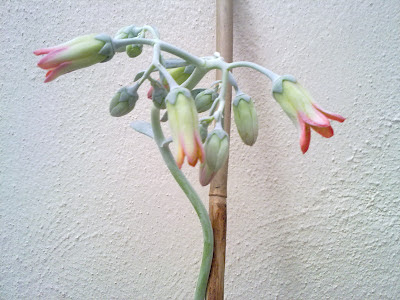
I had to support the plant with a bamboo stick because it grew too long and it sort of coiled in on itself.  I was afraid the main stem was going to give way. but as it turns out, the main stem is just as thick as the rest so it just bent, and let gravity take over.  Now it look much prettier.

kalanchoe flowers

kalanchoe flowers

kalanchoe flowers

It took a lot of juggling to take these last three pictures, so I didn't care much about the light, as long as the plant didn't move I was snapping away.

For some reason when flowers bloom I always feel excited, its like receiving presents on your birthday or Christmas, you just have to smile :)

Here they are in full bloom now:

kalanchoe flowers
Kalanchoe Flowers In Full Bloom

Read More...

Saturday, July 21, 2012

Who Gardens In A Summer Heat Wave?

5 comments
What a month July has been so far.  We've both been very busy lately with all sorts of things life throws at you from time to time.  Some have been good, some not so good, but to add to the madness of these past three weeks, nature decided to help us out by scorching us with a heat wave that seemed never ending.  Needless to say, tempers were on edge, and it was tough to keep up the momentum when all you want to do is lie down on the sofa with the air conditioner on at full blast.  

My yard was not a happy yard this month.  Temperatures rose to about 36 degrees Celsius (96 F) from 28 degrees almost overnight, and the heat stress index was about 45 degrees (113 F).  My plants joined us in our slumber, and everything stopped growing.  Now that the temperatures are back to normal I decided to go have a look, and maybe do some trimming here and there.  

The plant that got the most damage surprisingly enough was my Jade plant.  I still keep this plant indoors on a windowsill, and now I realise it may not have been such a good idea.  The leaves have started bleaching and going yellowish in colour, despite my watering it regularly.  

jade plant, yellow leaves
Jade Plant Leaves Going Yellow

I have also noticed that some leaves have brown spots on them, or brown edges, like someone concentrated a beam of light on them and burnt them.  It's possible that this is due to the window acting like a lens (does that make sense?).  In any case I have now removed it from the window sill and placed it on a makeshift dining table near the window, that way it will still get the light, but not as direct as it used to.

jade plant leaf
Leaves with brown spots

jade plant, yellow leaves
More brown spots and some 'burnt' edges

Outside in the yard, things are pretty much the same.  The two Kalanchoes are doing very well, and they seemed unaffected by the heat.  I did notice some burnt leaves on the 'Baby Kalanchoe' but nothing too worrying I hope.  It still has lots of healthy new leaves.

kalanchoe marmorata
Mummy Kalanchoe

kalanchoe marmorata
Baby Kalanchoe growing strong

My Plumbago has stopped flowering altogether these past weeks.  Today I trimmed it a bit and removed all the dead flowers.  This week I have a couple of flowers in bloom so it looks like it's waking up from its slumber and back to producing those lovely purple flowers.

Speaking of flowers, there are none on my Kalanchoe yet.  The buds have increased though, but I'm still waiting.

kalanchoe marmorata flowers
Still waiting for those flowers

The biggest tragedy of all this month must be my basil.  I normally sow a pot of basil each year from seed and keep it on our roof so it can get all the sunshine it needs.  It appears however that our sun is a bit too much for the basil, and to add to its misfortune I have not watered it nearly as much as I should have.

basil dried
Basil Tragedy

I have made it my mission to revive this plant.  I have been told to cut it right to the ground and it will revive itself, but I couldn't bring myself to do that.  I'm still very careful with the shears, more than I need to be, but I'm still uncomfortable with just cutting off to my heart's content.  I brought the pot in to the yard, where it will stay for the rest of its days.  I cut off all the dead stems and the flower heads.  Any stems which had green leaves on them I left, and I gave it a bit of water.  

basil dried
Basil in recovery

So there's my Summer update so far.  Not much action, but that's normal for us here.  Hope you are having a more relaxing and cooler Summer, and hope that August does not burn us to a crisp.  Fingers crossed.


Read More...

Thursday, July 5, 2012

Kalanchoe Summer Bloomer

4 comments
I can't believe it's been almost two weeks since my last post.  We're having such a busy month this month we are hardly spending any time at home let alone in my yard looking at my plants.  It's just one of those crazy times we all go through I guess from time to time.  This morning as I rushed out to water my rather neglected plants I had a lovely surprise.  My little Kalanchoe ( I don't know the actual name) is almost in bloom :)

kalanchoe
The Kalanchoe has grown quite long in a couple of months

kalanchoe
Three lovely buds
I took these pictures with my mobile phone at six o'clock this morning, so they are not exactly first class.  This plant has been relatively quiet all year growing little by little.  Now, however, it suddenly had a growth spurge, and has grown very long in just a couple of months.  Like the rest of the Kalanchoes I don't water this one very often, and it doesn't seem to require that much either.  It takes a long time for the soil to dry so I pretty much leave it alone.  The soil is very well drained, a bit too much I think, because when I water it, the water just goes straight out of the pot to the ground.  It doesn't seem to mind that though.  

I am very excited to see what the flowers will look like.  This is the first Kalanchoe to make flowers in Summer, the other two flowered in Winter.  It's great that despite coming from the same family (of a few thousand different species) they have such great differences.  

Read More...

Thursday, June 14, 2012

A Tale Of Two Kalanchoes

1 comment
Mummy Kalanchoe

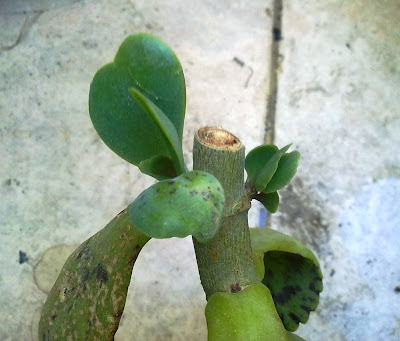
Ten days ago I decided to try to propagate my Kalanchoe Marmorata because it was spreading all over the place.  I now have two Kalanchoes and my visit this afternoon resulted in quite a few surprises.

kalanchoe marmorata
New Stems A Sprouting

kalanchoe marmorata stem
New Stems A Sprouting

I'm calling this one the Mummy Kalanchoe since it was the main plant that I cut the stem from, and it looks like the pruning has done it well.  I have a new plant sprouting from the base of the stem, and another stem sprouting from the bit of the stem that I cut off.  It is looking very promising, but it is also looking like the new stems are growing in opposite directions, meaning that I may have to take more cuttings from this one.  They will make lovely gifts :)

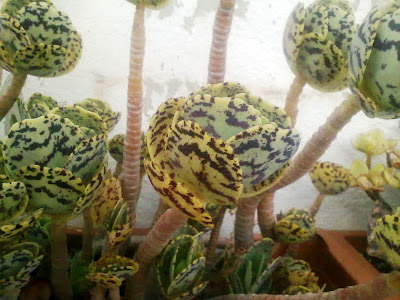
I wonder if the new growth at the bottom will now resemble what the Kalanchoe is supposed to look like.  I am still amazed at the way this plant has grown, it's hard to believe that the original plant looks like this:

kalanchoe marmorata
Grandma Kalanchoe, where I got the first cutting from


Baby Kalanchoe

The stem that I cut off is now fully speckled, as you would expect from this plant.  I am still unsure about this one.  The leaves look like they have grown 'old' overnight, wrinkle to the touch, but it still seems to be ok.  This one cutting will determine what I do with any future cuttings from Mummy Kalanchoe.  I hope that it survives and thrives.  The timing for propagation was good, it is suggested that you do this late Spring early Summer.  I guess only time will tell.

kalanchoe marmorata
Baby Kalanchoe fully speckled

kalanchoe marmorata
Baby Kalanchoe with some burnt edges

Read More...